Halloween Graveyard Brownie Cups
GRUB TOGETHER · HALLOWEEN DESSERTS
A Spooktacular Chocolate Dessert Everyone Will Want to Dig Into
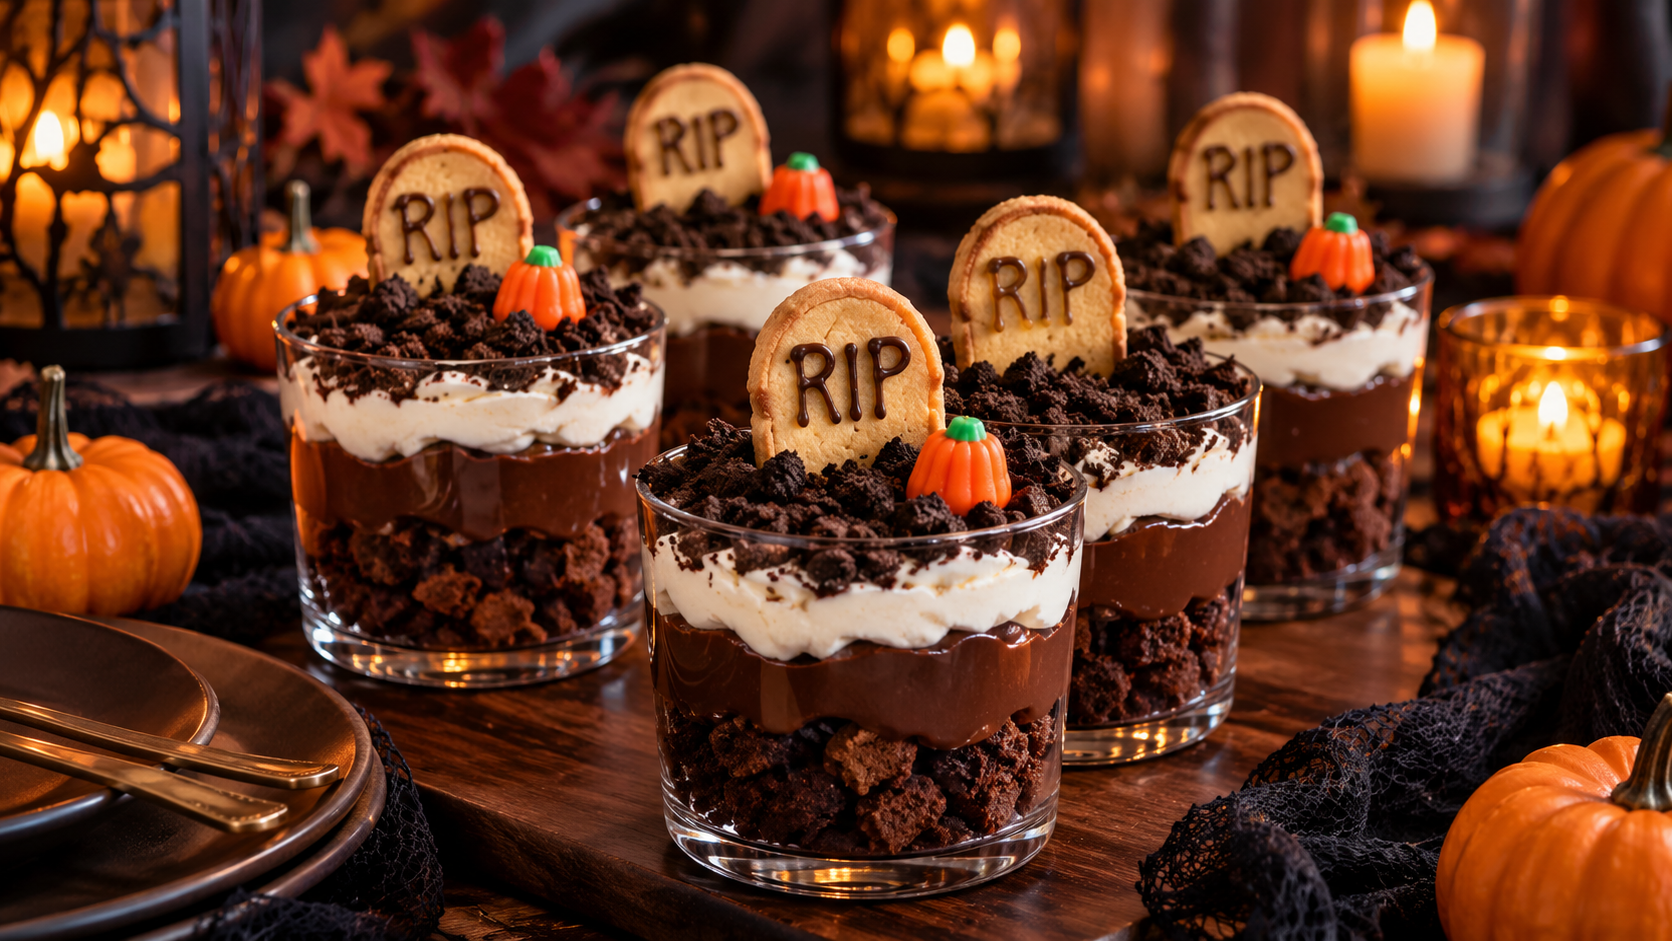
Rich, fudgy brownies. Silky chocolate pudding. Fluffy whipped topping. A generous layer of chocolate cookie “dirt.” And one adorable little tombstone to complete the scene.
These Halloween Graveyard Brownie Dessert Cups are festive, indulgent, and surprisingly simple to assemble. They’re a fun way to bring a little Halloween magic to your next family gathering or party.
Jump to the Recipe ↓ACTIVE PREP
25 Minutes
CHILL TIME
1 Hour
YIELD
12 Cups
A LITTLE SPOOKY. A LOT DELICIOUS.
The Perfect Halloween Dessert for a Crowd
Halloween desserts should be fun. They should make people smile before they ever take the first bite.
That’s exactly what makes these little graveyard brownie cups such a wonderful party idea.
Every cup is its own miniature chocolate graveyard, complete with layers of rich brownies, smooth chocolate pudding, a fluffy whipped layer, crushed cookie crumbs, and an edible tombstone.
The combination brings together several familiar dessert favorites in one individual serving. And because the cups are assembled using prepared brownies and instant pudding, there’s no complicated baking project involved.
Whether you’re hosting a Halloween party, preparing treats for a family movie night, or bringing dessert to a fall gathering, these chocolate cups are an easy way to make the dessert table feel special.
Why These Dessert Cups Work So Well for Parties
- Individual servings: Guests can grab their own dessert without anyone needing to slice and serve a large cake.
- Make-ahead friendly: Most of the dessert can be assembled before the party begins.
- Familiar ingredients: Brownies, pudding, whipped topping, and chocolate cookies are easy to find.
- Beautiful presentation: Clear cups show off every delicious chocolate layer.
- Easy to customize: Each guest’s dessert can have its own decorative cookie, candy pumpkin, or Halloween message.
THE COMPLETE RECIPE
Halloween Graveyard Brownie Dessert Cups
Rich layers of prepared brownies, chocolate pudding, whipped topping, and cookie crumbs finished with edible Halloween tombstones.
Prep time assumes the brownies are already baked and completely cooled.
Ingredients
- 24 ounces prepared brownies, completely cooled and cut into small cubes or crumbled
- 2 packages (3.9 ounces each) instant chocolate pudding mix, regular variety
- 4 cups cold milk, or the amount directed by your pudding package
- 1 container (8 ounces) frozen whipped topping, thawed according to package instructions
- 20 chocolate sandwich cookies, crushed into fine crumbs
- 12 oval or rectangular cookies, for edible tombstones
- 1 small tube chocolate decorating icing, for writing on the tombstones
- 12 small candy pumpkins, optional, for decorating
Twelve clear 9-ounce dessert cups, a large mixing bowl, a whisk, a spoon or piping bag, and a resealable bag or food processor for crushing cookies.
Step-by-Step Instructions
STEP 1
Prepare the Brownies
Use completely cooled, prepared brownies. Cut them into small cubes or crumble them into bite-sized pieces. Divide the brownies evenly among the bottoms of twelve dessert cups.
STEP 2
Make the Chocolate Pudding
In a large bowl, whisk both packages of instant chocolate pudding mix with four cups of cold milk for approximately two minutes, following the package directions. Allow the pudding to stand for about five minutes to thicken.
STEP 3
Add the Chocolate Layer
Spoon the thickened chocolate pudding evenly over the brownie pieces in each cup. Smooth the pudding gently so the layers remain visible through the sides of the clear cups.
STEP 4
Add the Whipped Topping
Spoon or pipe a layer of thawed whipped topping over the pudding. Divide it evenly among the cups. The contrasting cream-colored layer gives the desserts a beautiful layered appearance.
STEP 5
Chill the Dessert Cups
Cover the assembled cups and refrigerate for at least one hour. Keep the cups chilled until you’re ready to decorate and serve them.
STEP 6
Make the Cookie Dirt
Crush the chocolate sandwich cookies into fine crumbs using a food processor or a resealable bag and rolling pin. Just before serving, sprinkle the crumbs evenly over each dessert cup to create a dark, soil-like surface.
STEP 7
Create the Tombstones
Use chocolate decorating icing to write “RIP” or “BOO” on the oval or rectangular cookies. Allow the icing to set according to its package directions before placing the cookies into the desserts.
STEP 8
Decorate and Serve
Gently insert one cookie tombstone into the crumb topping of each cup. Add a small candy pumpkin if desired. Serve chilled with a spoon.
This recipe uses established brownie, instant-pudding, and layered-dessert preparation techniques. This particular combination and assembly have not been independently kitchen-tested by Grub Together. Results may vary depending on ingredient brands and cup sizes.
LESS STRESS, MORE CELEBRATING
Can You Make Graveyard Brownie Cups Ahead of Time?
Yes! That’s one of the reasons individual dessert cups work so well for entertaining.
You can prepare the brownie, pudding, and whipped topping layers up to one day before your gathering. Cover each cup and keep them refrigerated.
For the best presentation, save the chocolate cookie crumbs, candy pumpkins, and tombstone cookies until shortly before serving.
The cookies can soften when they sit against the moist pudding and whipped topping for extended periods, so adding them at the end helps preserve their texture and appearance.
Keep these dairy-containing desserts refrigerated at 40°F or below. Do not leave them unrefrigerated for more than two hours, or more than one hour when the temperature exceeds 90°F. Return unused portions to the refrigerator promptly.
PLANNING FOR A CROWD
How Many Dessert Cups Should You Make?
Plan for one dessert cup per guest, with a few extras if you’re hosting a large celebration. Use the following quantities to adjust the recipe.
| Ingredient | 6 Cups | 12 Cups | 24 Cups |
|---|---|---|---|
| Brownies | 12 oz | 24 oz | 48 oz |
| Pudding mix (3.9 oz) | 1 box | 2 boxes | 4 boxes |
| Cold milk | 2 cups | 4 cups | 8 cups |
| Whipped topping | 4 oz | 8 oz | 16 oz |
| Sandwich cookies | 10 | 20 | 40 |
| Tombstone cookies | 6 | 12 | 24 |
These quantities are proportional estimates. The final fill level depends on cup capacity and how tightly the brownie layer is packed.
THE FUN PART
How to Create a Show-Stopping Halloween Dessert Table
One of the best things about these graveyard brownie cups is how easily they become part of your Halloween decorations.
Arrange the dessert cups on a wooden serving tray or a dark cake stand. Surround the display with small pumpkins, autumn leaves, and battery-operated candles.
A little black gauze or spiderweb-inspired fabric beneath the serving tray can add a spooky touch without getting in the way of the desserts.
Choose Clear Cups
The visible brownie, pudding, and cream layers make each dessert look as appealing from the side as it does from above.
Vary the Tombstone Messages
Try short icing messages like RIP and BOO, or decorate some cookies with tiny edible spiderweb designs.
Keep the Decorations Simple
One cookie tombstone and one miniature candy pumpkin are enough to give each cup its own Halloween personality.
Easy Ways to Make These Dessert Cups Your Own
Use Your Favorite Brownies
Fudgy boxed-mix brownies, bakery brownies, and your favorite homemade brownies can all serve as the base. Whatever you choose, allow the brownies to cool completely before layering.
Keep the Decorations Simple
If you don’t want to pipe icing, use plain oval cookies as tombstones. You can still create a recognizable graveyard appearance with the cookie crumbs and candy pumpkins.
Try Smaller Party Portions
For a dessert buffet with several sweet options, consider assembling smaller portions in mini cups. Use the same layering method, but expect the number of servings and amount of decoration needed to change.
YOUR QUESTIONS ANSWERED
Halloween Brownie Dessert Cup FAQs
Are these Halloween dessert cups no-bake?
They require no baking during assembly if you use prepared brownies. If you’re making brownies from a mix or homemade recipe, bake and cool them first.
Can you make graveyard brownie cups the day before?
Yes. Assemble the brownie, pudding, and whipped topping layers in advance, then cover and refrigerate. Add cookie crumbs and decorations shortly before serving.
What kind of pudding should I use?
Regular instant chocolate pudding mix is the simplest option. Follow the directions and milk quantities on the package for proper thickening.
What can I use for tombstone cookies?
Oval butter cookies, rectangular wafer-style cookies, or other firm cookies that can stand upright make good edible decorations.
Can I make these for a school Halloween party?
These individual desserts can be convenient for group events, provided the school permits homemade or refrigerated food. Check food allergy requirements, and keep the cups chilled until serving.
COMPLETE YOUR GATHERING
Pair These Desserts with a Festive Party Punch
Every great Halloween dessert table deserves something delicious to drink!
A big bowl of ruby-red cranberry-orange punch makes a beautiful companion to these chocolate graveyard cups.
Planning drinks for a larger gathering? Our Grub Together punch guide will help you determine how much to prepare.
How Much Punch Do You Need for a Party? →Featured and Pinterest images are AI-created recipe illustrations. Actual results may vary.